IMPORTANT
SAFETY INSTRUCTIONS PLEASE READ ALL INSTRUCTIONS CAREFULLY
BEFORE INSTALLING & OPERATING
PLEASE
NOTE.
Do
not dispose of any packaging until the installation of the
equipment is completed. (See list of accessories).
1.2
BS PLUG WIRING
Wiring
Instructions: Should it be necessary to change the plug
please note the wires in the mains lead are coloured in
accordance with the following UK code
240v AC:
BLUE
- NEUTRAL
BROWN
- LIVE
GREEN
AND YELLOW - EARTH
13A
(BS 1363) 13A
Wiring
for a 13 Amp Plug (BS1363)
After
having removed the packing, check that all the content is
intact and complete. In the event of missing parts, contact
your retailer. This unit has been designed to cool or heat
the air of a room and should only be used for this purpose.
The manufacturer cannot be held liable for damage caused to
property or injury to persons or animals due to incorrect
installation, regulation and maintenance or improper use.
This air-conditioner contains R410-A refrigerant: at the end
of its life, the disposal of this equipment must be in
accordance with the strict regulation governing the
recycling of this product, please operate with caution
during the disposal. Please contact your local
authority for regulatory advice. Do not switch on before
having totally assembled the unit and before installing in
its correct operating position. Before
starting the appliance, check that it is correctly earthed,
according to the legislation in force in the country
concerned. As the colours of the wires in the mains lead of
this appliance may not correspond with the coloured markings
identifying the terminals in your plug, proceed as
follows:
1.
The wire is the and must be connected to the terminal which
is marked with the letter or
coloured .
2.
The wire is the and must be connected to the terminal which
is marked with the letter or coloured
3.
The is the and must be connected to the terminal which is
marked with the
letter
or or coloured .
4.
Always ensure that the cord grip is positioned and fastened
correctly. If a fused plug is used it must be fitted with a
fuse. If in doubt consult a qualified electrician.
1.3
IMPORTANT SAFETY INSTRUCTIONS
1.4
RECEIVING THE GOODS
When
using electrical appliances, basic safety precautions should
always be followed:
1.
Do not place objects on the product or allow objects to
obstruct the inlet or outlet openings.
2.
Extreme care should be taken when any product is used by, or
near children and pets, and
whenever
the product is left operating and unattended.
3.
Please note: If you are drilling the hole above ground floor
level, please ensure that an area has been secured and while
the holes are drilled the outside area is supervised, until
drilling has been completed.
4.
Before operating the product remove the unit from its
packaging and check it is in good condition.
5.
Do not let children play with the packaging, for example
plastic bags.
6.
Do not operate any product with a damaged cord or plug, or
after the unit malfunctions, has been dropped, or damaged in
any manner. Return the unit to an authorised service
facility for examination and repair to avoid a hazard.
7.
Do not attempt to repair or adjust any electrical or
mechanical functions on this unit as this may void warranty,
contact your service engineer.
8.
Always operate the product from a power source of the same
voltage, frequency and rating as
indicated
on the product identification plate.
9.
This unit is not intended for use in wet or damp locations.
10.
Do not place the unit near an open flame, cooking or heating
appliance, or hot surface.
11.
Do not let the power cord hang over the edge of a table or
counter. Arrange the power cord away from an area where it
may be tripped over.
12.
Never place the power cord under a carpet or rug. Do not
operate the unit in areas where petrol
,paint, or other flammable liquids are used or
stored.
13.
Do not carry out any cleaning or maintenance or access
internal parts until the air-conditioner has been
disconnected from the mains electricity supply.
14.
Do not alter the safety or regulating devices without the
permission and instructions of the air
conditioner manufacturer.
15.
Do not pull, remove or twist the
electric cable connected to the air-conditioner, even if
disconnected from the mains electricity supply.
16.
Avoid prolonged direct contact with the flow of the air from
the unit and the room being closed with no ventilation for a
long period of time.
17.
If the fresh air intake duct is not installed, periodically
open the windows to guarantee a correct change of air.
18.
Repair or maintenance work must be carried out by a service
engineer or by qualified technicians in compliance with the
instructions given in this booklet. Do not alter the
appliance, since hazardous situations could be created while
the manufacturer of the appliance will not be liable for any
damage or injury caused. This instruction booklet is an
integral part of the appliance and should therefore be
carefully preserved and always accompany the appliance in
the event of transfer to another owner or user or another
installation engineer. Should the booklet be damaged or
lost, please request an additional. The air conditioner is
delivered in a protective packaging and is accompanied by an
instruction manual. This manual is an integral part of the
air conditioner and should therefore be carefully read and
preserved. When the unit is unpacked, please check that the
equipment and the accessory pack are complete and undamaged.
1.5
HANDLING
To
avoid any possible damages during transportation the unit is
provided with compressor holders that
must be removed before installing the air conditioner (see
2.7).
1.6
PART LIST
1.
FASTENING BRACKET
2.
REMOTE CONTROL
3.
REMOTE CONTROL HOLDER
4.
DRAINAGE PIPE
5
EXTENSION CONDENSATE HOSE
6.
PIPE FASTENING INNER FLANGE
7.
EXTERNAL GRATING
8.
HOT AIR DISCHARGE PIPE (160 mm.)
9.
AIR INTAKE PIPE (150 mm.)
10.
PAPER TEMPLATE FOR WALL DRILLING
11.
KIT OF SCREWS AND CABLE TIE
12.
GRATING FIXING CORD
13.
INSTRUCTION MANUAL
14.
RUBBER PLUG
Any
batteries used in the remote control contain materials,
which are hazardous to the
environment.
They must be removed from the remote control when they reach
the end of their life and disposed of responsibly.
2.1
POSITIONING THE AIR CONDITIONER
To
maintain the best performance from your unit, prevent
breakdowns or hazards, you must position
it correctly. Please follow the guidelines and instruction
below in full, as failure to do so
could
cause potential installation problems.
-
The air conditioner must be installed on an exterior wall
that has access to the out side with a
minimum
of 2 metres clearance to the outside. There should be no
obstacles within the 2 metres, to allow circulation of the
airflow.
-
The unit must be fitted leaving room all around as
illustrated in the paper template.
-
The
wall on which the unit is installed must be sturdy and able
to withstand the weight of the unit. After determining the
best place for installation as described above, please check
to ensure that the wall can be drilled in the chosen area
without interfering with other structures or installations
(beams, piers, pipes, wires, etc.).
-
Please
also ensure that there are no obstacles on the outside of
the wall, which may obstruct air circulation through the
drilled holes, for example: plants and their leaves, slats
or panelling, drain pipes, overflows and gratings, etc.).
Any obstruction could interfere with the correct performance
of the unit.
2.2
PAPER TEMPLATE
Paper
Template (copy to scale enclosed with accessories) drilling
the hole above ground floor level, please ensure that an
area has been secured and while the holes are drilled the
outside area is supervised, until drilling has been
completed.
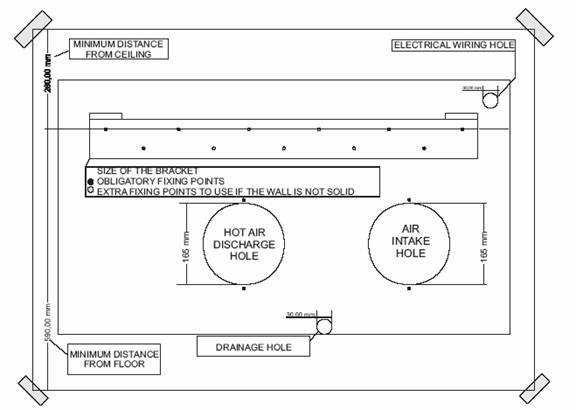
INTAKE
AND OUTLET HOLES
DRAINAGE
HOLE
Fasten
the template to the wall once the following guidelines have
been thoroughly checked.
Do
not drill any holes until you are 100% confident that there
are no obstacles in the area you wish to drill and there are
no obstructions, which could be hidden by the construction
of the wall, for example: Electrical wiring water & gas
pipes or supporting lintels or beams. Ensure that a sprit
level is used, as the unit must be level. Follow the
installation instructions & measurements in full.
This
operation should be carried out using the proper tools
(diamond tip or core borers
drills with high twisting torque and adjustable rotation
speed). Fasten the template to the wall taking care to check
the distance From the floor and
or ceiling and keep it horizontal by using a spirit level.
Use
a pilot drill to mark the centre of each core hole to be
drilled. Use a core 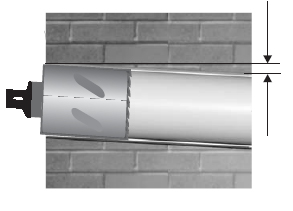 boring
head having a diameter of 165 mm to drill the two holes for
intake and outlet the air. It is recommended that the holes
must have a slightly downward inclination of 3-5 degrees to
prevent any backflow of water from the pipes. The unit
produces condensate that has to be extracted to enable the
unit to operate correctly. It is necessary to drill a hole
through the wall measuring 30mm in diameter in the position
shown in the paper template. Drainage occurs by gravity. For
this reason, it is essential for the drain line to have a
minimum downward inclination of at least 3% throughout its
length.
boring
head having a diameter of 165 mm to drill the two holes for
intake and outlet the air. It is recommended that the holes
must have a slightly downward inclination of 3-5 degrees to
prevent any backflow of water from the pipes. The unit
produces condensate that has to be extracted to enable the
unit to operate correctly. It is necessary to drill a hole
through the wall measuring 30mm in diameter in the position
shown in the paper template. Drainage occurs by gravity. For
this reason, it is essential for the drain line to have a
minimum downward inclination of at least 3% throughout its
length.
2.4
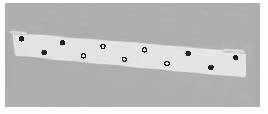
FASTENING THE BRACKET
Drill
the holes for anchoring the fastening bracket to the wall
using preferably the 6 holes showed
in black on the paper template. If the wall is not sturdy
enough it is advisable to use
extra
anchor bolts using the holes showed in grey on the paper
template. The anchor bolts provided require a
8mm holes; the wall should be inspected to determine if
provided bolts are useful or if it is necessary to use a
different anchorage. The manufacturer is not liable in case
of underestimation
of the structural consistency of the anchorage made at the
time of installation.
2.5
INSTALLATION OF THE PIPES
After
drilling the holes, the plastic pipes supplied with the air
conditioner need to be fitted through them. The pipe with a
diameter of 160mm (hot air discharge) and has to be fitted
in the left hole. The length of the pipes should be 10 mm
less than he depht of the wall.
Use a normal hacksaw to cut the supplied pipes to the
correct length. The tube diameter is nearly the same as that
carried out using the 165 mm nominal diameter core drill
therefore you may need to slightly force the introduction of
the pipe, using in difficult cases, a normal rubber hammer
and a small piece of timber to gently tap the tube into the
hole. Fit the plastic pipe into the hole and fasten the
flange with 2x6 mm screws and wall plugs. Should the
insertion prove to be too difficult, we suggest you drill
using the core bit inside the hole so as to widen the
internal diameter slightly.
Please
use the same instructions to fit the right hand tube (air
intake pipe) using the supplied pipe with a diameter of
150mm.The tube diameter is slightly smaller than that
carried out using the 165mm core.
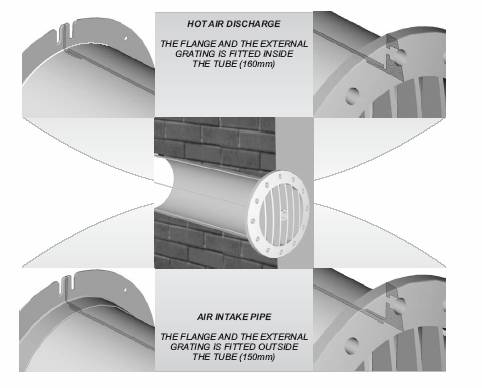
2.6
FITTING THE GRATINGS
If
the external grating is accessible to prevent its removal,
it is recommended to fasten it to the wall with wall plugs
and screws with a diameter of 6 mm.
To
fit the external two gratings please proceed as
follows:
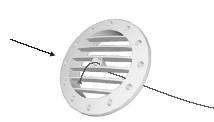
Familiarise
yourself with the fitting of the grating to the tube, before
installation. Insert the cords through the centre of the
grating. One grating fits on the outside of the tube and the
other fits inside. The air intake is the smaller hole and
the grating therefore fits on the outside of the air intake
tube. Insert the supplied cord into the hole. Fold the outer
grating in half grasping the cord with your free hand.
Insert your arm inside the pipe with the grating and push
all the way to the outside. Let the grating unfold and pull
the cord towards you. One grating fits on the outside of the
tube and the other fits inside. With a little patience and
manipulation the two gratings will fit the end of the tubes.
Grasping the cord, insert your fingers between the fins and
pull the grating towards you until it is properly positioned
in the pipe, keeping the fins in a vertical position.
Tighten the cord and fasten it to the dent on the internal
flanges.
2.7
FITTING THE UNIT ON BRACKET
After
checking again that the fastening bracket is securely
fastened to the wall, and that any necessary preparations
for electric connection and condensate drainage have been
made, please remove the compressor holders (remove plastic
belt A and unscrew holder B and fasten the air conditioner
to its supporting bracket, A and B can be discarded ).
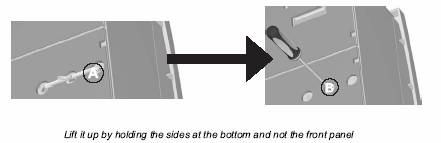
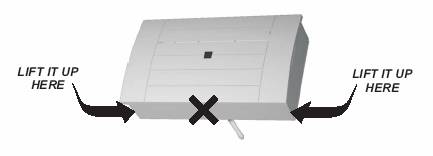
Lift
it up by holding the sides at the bottom and not the front
panel Tilt the unit slightly
towards you to facilitate the operation of fastening it onto
the bracket. The unit is provided with an insulated drainage
pipe (450mm long), to fit on the pipe that protrudes from
the lower backside of the unit,which
is inserted in the drainage hole. The air conditioner can
now be pushed firmly against the wall. Carefully inspect the
installation to ensure that the insulating back panel fits
firmly against the wall and there are no fissures at the
back of the air conditioner.
2.8
DRAINAGE LINE
To
complete the drainage line fit the drainage pipe on the
drainage hole and push firmly into lace. A further extension
pipe with an internal diameter of 16 mm can be fitted
if necessary.
If
the line drains into a vessel (tank or other recipient),
this container should not be sealed and the drainpipe should
not remain immersed in the water. Install the extension
drain condensate as required. The
drain should flow in a downwards direction, as this is a
gravity flow (E).
3.1
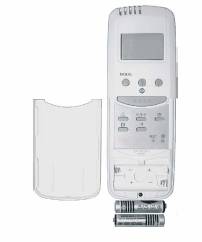
REMOTE CONTROL FITTING AND CHANGING THE BATTERIES
-
Slide off the cover on the front of the remote to reveal the
battery compartment. - Insert the battery (2 x AAA). - Refit
the battery cover.
-
Important: if pressing ON/OFF button no icons are displayed,
please install the battery in the correct position.
-
The exhausted batteries must be disposed of responsibly.
Switch on the remote control using the pink button in the
centre of the remote control. Firstly set the time by gently
depressing the timer set button in the bottom right hand
corner just above the battery compartment, then adjust the
time by using button to adjust the minutes and button to
adjust the hours.
Once
this has been done, press the MODE button to select the
required function:
-
Cooling - Dehumidification - Fan only - Heating - Auto.
When
the mode is selected, adjust the temperature setting to your
comfort: these temperatures are dependent on your individual
requirement and can be adjusted while the unit is running.
In Auto mode the temperature settings are not adjustable
(see paragraph 3.9 )
Slide
the front panel downwards to display further buttons.
Timer
on - Timer off - Fan speed x 3 - Sleep - Louvers.
Please
refer to the following sections:
All
the air conditioners functions are controlled, set or
adjusted through the infrared remote control. You cannot
fully operate the unit without the remote control, so please
ensure you replace the remote after use in the provided
holder. If the remote control is misplaced, switch the unit
off via the mains socket. To switch the unit on, plug back
into the power socket. The unit will thus start up in the
last programmed setting. For example if in heating and
switched off via the mains socket and then reconnected, the
unit would then operate in heating mode. A new remote will
need to be purchased from your supplier if misplaced.
3.2
REMOTE CONTROL FUNCTIONS
To
operate the unit, direct the remote control at the
unit.
3.3
INSTRUCTION FOR USE WITH REMOTE CONTROL
-
Press the MODE button until the cooling mode is set.
-
Press the and buttons to set the
required room temperature.
-
Press the button and select the fan speed to high
,middle , low or auto.
(If
AUTO is chosen, the fan speed is automatically adjusted to
keep it as high as needed to reach the set (temperature)
-
Press the MODE button to find cooling /heating /auto
.
-
Press the and buttons to set the
required room temperature (not possible in AUTO function).
-
Press the button : when this icon
is displayed, the fan speed is automatically set at the
lowest level.
-
Press again to cancel this function setting.
-
Press the MODE button until the heating mode is set
.
-
Press the and buttons to set the
required room temperature.
-
Press the button and select the fan speed to high
,middle , low or auto.
(If
AUTO is chosen, the fan speed is automatically adjusted to
keep it as high as needed to reach the setting temperature).
-
Press the MODE button until the dehumidifying mode is set
.
-
The fan speed is automatically set.
-
Press the MODE button until the fan mode is set.
-
Press the button and select the fan speed to high
, middle ,low or auto.
-
Press the MODE button until the AUTO mode is set.
-
Press the MODE button and set the desired function.
-
Press the buttons and to set the required room temperature.
-
Press the button and select the fan speed among high middle
,low or auto.
(In
case AUTO is chosen, the fan speed is automatically adjusted
to keep it as high as needed to reach the setting
temperature).
-
Press the button and adjust the switching off time pressing
the button (hours) and (minutes).
-
To confirm the setting, press again .
-
Once the time is over, the unit will switch off
automatically.
The
setting will be cancelled if the button is pressed again.
When
you set the temperature in cooling mode, the LCD on the
front of the unit shows the set point, then after a few
second the LCD display will then revert to room temperature
and will decrease by 1 degree C in turn until the unit
reaches your desired temperature.
When
the equipment first turns onto heating mode, there will be a
short delay of three or so minutes, this is a normal time
delay function and the equipment will start heating after
this short period of time. When you set the temperature in
heating mode, the LCD on the front of the unit shows the set
point, then after a few second the LCD will then revert to
room temperature and will rise by 1 degree C in turn until
the unit reaches your desired temperature.
In
this mode the air conditioner will attempt to maintain the
room temperature between 20 C and 25 C. If the room
temperature is below 20 C it will be in heating mode, if it
rises above 25 C the unit will be in cooling mode, if it is
between the two the air conditioner will simply circulate
room temperature air. The reason for the 5 C 'gap' is to
stop the compressor oscillating rapidly between heating and
cooling as this would severely shorten the life of the
product should it be allowed to happen.
AUTOMATIC
SWITCHING ON
-
With the unit switched on, select the desired function by
pressing the MODE button.
-
Switch off the unit.
-
Press the button.
-
Set up the switching time pressing the buttons (hours) and
(minutes).
-
To confirm the operation, press again the button.
The
unit will start to work automatically according to the
selected time.
-
To cancel the setting, press again the button.
3.11
MAINTENANCE INTERNAL
UNIT MAINTENANCE FILTERS CLEANING:
ATTENTION
CLEANING THE UNIT:
The
filters should be regularly cleaned to keep the unit running
efficiently. Clean the filters every two weeks.

How
to proceed:
-
Disconnect the unit from the electrical supply.
-
Extract the filter grating.
As
the filter has three different compositions, the cleaning
operations should be done as follows:
-
Extract the filters B/C from their case.
-
Clean the B / C filters only with a vacuum cleaner, being
careful not to damage them.
-
Clean the A filter by washing it with warm water (max 40°C)
and mild detergent.
-
Rinse it with water only and let it dry in a shadowy place
(do not expose it to direct sun rays).
-
When the filter is perfectly dry, insert it back together
with the other filters in their original position.
-
Insert the grating above the unit until it is perfectly
positioned.
-
It is advisable to change the B / C filters annually.
:
Do not use the air conditioner without filters as it could
seriously damage the unit.
-
Disconnect the unit from the electrical supply.
-
Wipe external surfaces clean with a damp cloth only.
-
Do not use an abrasive cloth and/ or solvents, as this may
damage the surfaces.
-
Do not use excessively wet cloths or sponges, as water
stagnation could damage the unit and
compromise
safety.
3.12
PROBLEM SOLVING PROBLEM
The
air conditioner does not work:
-
Wrong setting of the timer / Check it.
-
Problems on the power supply/Verify the Presence of voltage.
The
air-conditioner does not refrigerate the room Strange
smell in the room:
-
The filter could be dirty / Clean
it.
-
The room temperature is too high / Wait until the
temperature goes down.
-
The temperature is not properly set / Check it.
-
The grids could be obstructed / Check and remove the
eventual obstacles.
-
Dampness in the room, coming from walls, carpets, furnishing
or similar
Water
drips from the air conditioner:
-
Wrong installation of the air conditioner.
-
Wrong connection of the drainage pipe.
The
remote control does not work.
-
Exhausted batteries.
-
Wrong insertion of the batteries inside the remote control
The
air-conditioner does not work for 3 minutes when switched
on.
-
Protection of the air conditioner. Wait for 3 minutes and
the air-conditioner will start to work
again.