Call: +44(0)1234 841221           E-mail: [email protected]
Back
Home
Up
Next

Panasonic Aquarea air to water heat-pump domestic air source heat-pump boiler add


 Air source heat-pump boilers


Trianco Boiler manufacturer goes into administration


Shop For Our Products On-line


21 July 2010

A spokesperson for Trianco Heating Products has confirmed that the company has gone into administration.

The oil boiler manufacturer has declined to comment further at this time.

Trianco Heating Products manufactured oil boilers and renewable products such as heat pumps and solar photovoltaic panels at its factory in Chapeltown, Sheffield. 

Trianco previously went into administration in April 2006, when the previous owners sold the oil boiler company to current managing director, Peter Fergusson. It was then renamed as Trianco Heating Products, and the company expanded to include electric heating and renewable products such as the Activair air source heat pumps.

The company's business and assets is now up for sale through strategic property and asset solutions company Fox Lloyd Jones, under the instruction of receivers Deloitte.

Trianco Training Services Still Trading

The owners of unaffiliated company Trianco Training Services is keen to assure customers that this business is still trading, as it is an independent company not associated with Trianco Heating.

Training manager, Graham Ward, said: "The unfortunate demise of Trianco Heating products in no way affects the operation of Trianco Training Services.

"It is extremely sad that a company of such heritage and with whom we have worked closely over the years has come to an end."


IMPORTANT SAFETY INFORMATION FOR THE END-USER

• Installation of the appliance must only be carried out by persons with suitable engineering qualifications

• Do not attempt to modify, repair or service the appliance yourself

• Do not insert body parts or any other items into the air inlet or air outlet

• Do not start or stop the unit by removing the power cable; always use the controls and switches provided

• Ensure the appliance is protected from prolonged exposure to large quantities of water

• Do not operate the unit or the programmer with wet fingers

• Upon replacement of the fuse, ensure an adequate replacement is used (e.g. not fuse wire)

• Keep the programmer unit out of reach of children

• The electrical supply must be isolated during a heightened risk of lightning strikes

• Do not attempt to move the appliance once installed; this must be carried out by a qualified engineer

• Isolate the electrical supply to the appliance if an odour presents, or scorching is detected

• Only use this appliance for the purpose intended

• Ensure the area around the appliance is clean, well-ventilated and kept free of all obstructions

• Do not keep items on top of the appliance or use it to support other appliances

• Do not under any circumstances stand on the appliance

• Isolate the electrical supply to the appliance if it is to be switched off for a period of more than two weeks

• Drain the water from the water circuit if power to the unit is to be switched off during very cold weather

• Periodically check the condition of any supports for deterioration

• Do not wash the unit with water, alcohol, benzine, thinners, glass cleaner, polish or powders

• During cleaning, isolate the electrical supply to the appliance

CONTENTS

PAGE

Health & Safety (Materials) i

Important End-User Safety Information ii

Declaration of Conformity iii

Introduction 6

Operating Instructions 6

Setting the Clock/Timer 6 & 7

Non-timed Control 7

Setting the Water Temperature 7

Operating Parameter Display 8

Safety Cutout Devices 8

Servicing 8

Simple Fault-Finding 9

Tips for Lowering Energy Usage 9

After-Sales Service Information 10

Technical Information 11

Dimensions & Clearances 11

Water Connection Dimensions 11

Mounting Dimensions 11

Technical Specification 12

Performance Data 12

Installation Instructions 13

Introduction 13

Regulations 13

Siting & Ventilation 13 & 14

Electrical 14

Internal Wiring Diagram 15

Health & Safety 16

Heating & Domestic Hot Water Systems 16

Flushing & Water Treatment 16

Mounting 16

Example System Schematics 17 – 22

Drainage 23

Sealed System Components 23

System Filling 24

Commissioning 24

Servicing & Maintenance 24

Operating Parameters & Fault-Finding 25 & 26

INTRODUCTION

Please note, to assist Trianco in improving customer service, it is important that the guarantee/registration card is completed and returned. The Trianco Activair air source heat pump has been designed and constructed to give years of trouble-free service, and these instructions are provided to assist you in obtaining the best performance with the least trouble and cost. The Activair heat pump is designed to provide hot water or low-temperature comfort heating by extracting the ambient heat energy from the surrounding air.


The diagram below (fig. 1) shows the programmer layout with the controls uncovered (lift off the protective flap).

SETTING THE CLOCK

Before starting the appliance, the clock should be set to enable control of the heat pump via the timer. Note: the appliance operates on a 24-hour clock only. Ensuring the programmer is on standby (LCD screen will nt be illuminated), press the CLOCK button once. The first pair of digits in the clock display will begin to flash. Press the CLOCK ADJUSTMENT buttons (+/-) until the current hour is set. Press the CLOCK button once more; the second pair of digits in the clock display will begin to flash. Press the CLOCK ADJUSTMENT buttons (+/-) until the minutes past the hour are set. To return to standby mode, repeatedly press the CLOCK button until the current time is displayed in full.


OPERATING INSTRUCTIONS

The appliance is controlled via the remote programmer included with the unit. This can be situated anywhere in the property, enabling management of the settings without having to access the main unit. Before starting the appliance, ensure that it has been installed in full accordance with these instructions and that all necessary safety checks have been carried out.


.

SETTING THE TIMER

Using the timer, it is possible to set two separate time periods at which the appliance will operate. Ensuring the programmer is on standby (LCD screen will not be illuminated), press the CLOCK button three times. The first pair of digits on the clock display will flash and the timer settings display will read ‘ON’. The number immediately below this will indicate that programme #1 is currently being modified.

Press the TIMER ADJUSTMENT buttons (+/-) until the time is set to the hour you wish the appliance to start. Press the CLOCK button; the second pair of digits in the clock display will begin to flash. Adjust in the same way to set the minutes past the hour. Press the CLOCK button and set the hour you wish the appliance to cease operation. Press the CLOCK button once more and set the minutes past the hour.

To return to standby mode, repeatedly press the CLOCK button until the current time is displayed. To set a second programme, instead press the CLOCK button once. The first pair of digits on the clock display will flash and the timer setting display will read ‘ON’. The number immediately below this will indicate that programme #2 is currently being modified.

Use the TIMER ADJUSTMENT buttons (+/-) as described

above to set the second programme. After setting the minutes past the hour, press the CLOCK button once to return to standby mode.  To activate the programme(s), press the TIMER ON/OFF button once. The timer status display will read ‘1’. The Trianco Activair should now cut in and out according to the times set. The running indicator will display the SUN symbol whenever the appliance is operating.

Please note that during the time periods at which the appliance is set to operate, it will not do so constantly. When the cylinder water temperature has reached the required level, the heat pump will cease operation until the water has cooled or has been used. During these periods, the SUN symbol will flash in the running indicator display.

Please ensure that all other required parameters, such as cylinder water temperature (see adjacent column), have been set before operating the appliance.

To cease operation in this mode, press the TIMER ON/OFF button once. The timer status display will read ‘0’ and the appliance will return to non-timed control mode.

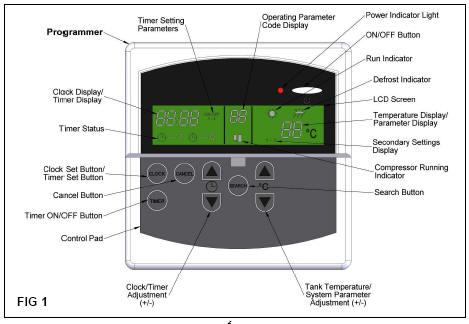
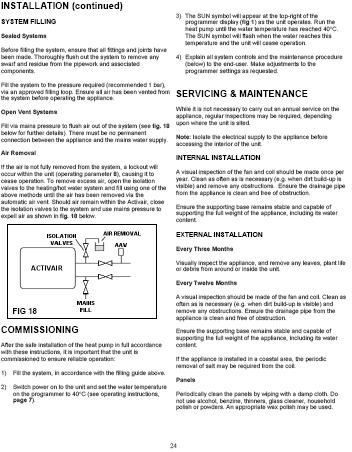
OPERATING PARAMETER DISPLAY

In certain circumstances, the unit may enter a temporary lockout mode in order to maintain efficient operation. During such times, a code will appear on the programmer display (fig. 1). This is entirely normal and the unit will automatically resume functioning once it has completed its reset cycle. In the unlikely event the appliance does not resume operation,  full descriptions of the operating parameters and their causes can be found on page 25.

FROST PROTECTION

As the appliance may be fitted externally to the property being heated, the water in the system may be in danger of freezing in very cold weather. As such, the Trianco Activair has frost protection which will bring the heat pump on should the temperature drop too low. However, to provide protection in  the event of a power outage, a suitable antifreeze should be added to the system.

DEFROST MODE

If the temperature is cold enough for ice to develop on the coil, this may become clogged and cause the appliance to cease operation. Should this occur, the unit will automatically enter defrost mode. This will divert heat from the heating circuit back to the coil until the ice has melted. The DEFROST symbol will appear above the temperature display (see fig. 1)during such times.

PRESSURE SWITCH

Should the refrigerant pressure within the appliance reach too high a level, the unit will automatically switch off until the pressure has been reduced, whereupon the unit will restart automatically. Please note that the unit may take several minutes to restart after the pressure switch has operated. Refer to the operating parameter descriptions, page 25, for further details.

AMBIENT TEMPERATURE CUTOUT

Should the ambient temperature around the appliance reach too high a level, the unit will automatically switch off until the  temperature has been reduced, whereupon the unit will restart automatically. Please note, that the unit may take several minutes to restart after the cutout has operated. Refer to the operating parameter descriptions, page 25, for further details.

SIMPLE FAULT-FINDING

If the appliance fails to start for no apparent reason, carry out  the following checks before referring to the operating parameter and fault-finding guide (page 25/26), or calling your service engineer:

1. The unit may be running through a process to clear an operating parameter condition. In most cases, this will becleared automatically, though if it persists, check the programmer display (fig. 1) for an operating parameter number. Refer to the guide on page 25 for full descriptions and remedies.

2. Ensure there is a current ‘heat demand’ from the programmer. Ensure the programmer clock and timer controls have been set in accordance with the instructions on pages 6/7 or that it is switched on (if in non-timed mode).

3. Check for failure in the electrical supply.

4. Check for a blown fuse. If the fuse has blown and the replacement also fails, switch off the mains electrical supply to the appliance and contact your service engineer.

5. Check the circuit breaker (if fitted). If this has tripped, reset and restart the appliance. If the circuit breaker trips for a second time soon after, switch off the mains electrical supply to the appliance and contact your service engineer.

Note: if the appliance has been shut down due to a failure of the power supply, the programmer contains a battery backup which will allow the preservation of all settings and timings. If the appliance is operating, but the water temperature is lower than expected:

1. Check that all isolation valves are fully open.

2. Check the water temperature setting is not too low. This

can be increased by following the instructions on page 7.

NON-TIMED CONTROL

It is possible to operate the appliance without using the timer control. Ensure that the clock and all other required parameters have been set before continuing. Ensure the timer status display reads ‘0’ and press the ON/OFF button at the top right of the programmer. The LCD display and power indicator light will illuminate and the appliance will start.

The running indicator will display the SUN symbol whenever the appliance is operating. The appliance will now run until the required cylinder water temperature is reached, at which time the SUN symbol will flash in the running indicator display. Please ensure that all other required parameters, such as cylinder water temperature (see below), have been set before operating the appliance.  To cease operation in this mode, press the ON/OFF button once. The LCD screen and power indicator light will fade.

SETTING THE WATER TEMPERATURE

The appliance can be set to heat water between a range of 20°C and 55°C, depending upon your preference. The water temperature can be adjusted at any time, whether the heat pump is running or inactive.

To set the cylinder water temperature, press the  TEMPERATURE ADJUSTMENT buttons (+/-). The temperature display will change accordingly, before returning to displaying the current cylinder water temperature. When the cylinder water temperature has reached the required level, the appliance will cease to operate until the water in the cylinder has been used or has cooled.

COIL TEMPERATURE CUTOUT

Should the coil temperature reach too high a level, the unit will automatically switch off until the temperature has been reduced, whereupon the unit will restart automatically. Please note that the unit may take several minutes to restart after the cutout has operated. Refer to the operating parameter descriptions, page 25, for further details.

COMPRESSOR OUTLET TEMPERATURE CUTOUT

Should the compressor outlet temperature reach too high a level, the unit will automatically switch off until the temperature has been reduced, whereupon the unit will restart automatically. Please note that the unit may take several minutes to restart  after the cutout has operated. Refer to the operating parameter descriptions, page 25, for further details.

SHUTTING DOWN FOR LONG PERIODS

If power to the heat pump is shut down for a long period during very cold weather, it is advisable to completely drain the system. However, too frequent draining of the system should be avoided, especially in hard water areas, as this could lead to the build-up of scale in any heating circuit.

SERVICING

While it is not necessary to carry out an annual service on the appliance, regular inspections may be required, depending upon where the unit is sited. Full details can be found on page 24.

3. Check that the vents on the back of the unit and the coil have not become blocked, impeding the air flow.

4. Check the unit has not entered defrost mode (the DEFROST symbol will appear above the temperature display – see fig. 1). Should this occur, the heat output from the appliance will be diverted to the coil, until any ice  build-up has been removed.

5. Ensure there is no air trapped in either the Activair or the heating/hot water system (page 24). If sounds are heard from the appliance which sound like the passage of water, this is merely the normal movement of the refrigerant within the unit. If there is power to the appliance and the programmer is providing a 'heat demand’ to the unit, yet the unit has not entered running mode (the SUN symbol has not appeared above the temperature display), it may be that one of the safety cutouts (see page 8) has operated. These will typically take several minutes to clear before the unit restarts.

Other Checks

Ensure the default system settings have not been altered. These are accessed by holding in the SEARCH button for five seconds when the programmer is switched off. These are factory-set and should not require adjustment.

Setting 1 - Factory-set at 26.

Setting 2 - Factory-set at 18.

Setting 3 - Factory-set at 14.

These settings should not be altered from the above without the express permission of Trianco. If for some reason the settings do not match the figures given above, alteration is made via the TEMPERATURE ADJUSTMENT buttons (+/-).


TIPS FOR IMPROVING PERFORMANCE AND EFFICIENCY

1) Unit maintenance has a dramatic impact upon system performance and service life. Ensure regular inspections are carried out over the lifetime of the appliance. Dirty coils and fans reduce airflow through the system, resulting in decreased performance. Regular checks should be carried out to ensure the cleanliness of these components. Refer to page 24 for details.

2) Programme the appliance to operate at times when the surrounding ambient temperature is at its highest (e.g. noon). A thermal store may be employed to allow the retention of hot water at this time for later use.

3) If installed externally to the property being heated, the unit should be protected from high winds, as this can lead to reduced airflow and efficiency, and also cause frost problems; though avoid siting in areas where the airflow is too restricted, resulting in recirculation of air over the coil.

4) Well-insulate the pipework to and from the appliance to retain as much heat as possible.

5) Where possible, subscribe to economy electricity tarrifs (contact your electricity supplier for more information).

6) Lower temperature settings will reduce the amount of energy consumed by the unit.

www.orionairsales.co.uk: Trianco Actrivair air source heat-pump boiler.

www.orionairsales.co.uk: Trianco Actrivair air source heat-pump boiler.


Output / Ambient

See graph below

Max. Input Power

3.9kW

Max. Input Current

17.7 amp

Cable Size

4mm

Flow Rate (primary water)

33 litres/min

Weight (empty)

120kg

Noise Level

64 dB(A)

Min. Water Output Temperature

20°C

Max. Water Output Temperature

55°C

Power Supply

230V -50Hz

Fused at 20 amp

Working Ambient Temperature Range

-5°C to 43°C

Flow & Return Connections

Ύ" BSP

Refrigerant

R417a (1.7kg)

Electrical Shock Protection

1

Water Protection

IPX4

Casing Finish

Grey

www.orionairsales.co.uk: Trianco Actrivair air source heat-pump boiler.

www.orionairsales.co.uk: Trianco Actrivair air source heat-pump boiler.

www.orionairsales.co.uk: Trianco Actrivair air source heat-pump boiler.

www.orionairsales.co.uk: Trianco Actrivair air source heat-pump boiler.

www.orionairsales.co.uk: Trianco Actrivair air source heat-pump boiler.

www.orionairsales.co.uk: Trianco Actrivair air source heat-pump boiler.

www.orionairsales.co.uk: Trianco Actrivair air source heat-pump boiler.


E-mail: [email protected]


Orion Air Conditioning & Refrigeration Ltd, 10 Grisedale Court, Woburn Road Industrial Estate, Kempston, Bedfordshire, MK42 7EE, UK

Terms of Use | Privacy Statement | Accessibility ©2007 Orion AC&R Ltd. All rights reserved